Our New Studio Website by Chris Foley

I've been using My Music Staff since 2015 and it has revolutionized a lot of my studio processes, from having a strong studio website to online registration, invoicing, scheduling, lesson notes, and repertoire management. After MMS launched their new website editor in 2024, I initially hesittated to use it since our studio was handling a record intake of new students and a full schedule.

But after I received an email that the old website editor would be sunsetted in mid 2025, I decided now was the time. The transition was smooth for the most part and I mostly transferred over the same pics and text with a few small changes. The new templates have a simplicity to them and render well on mobile, where probably over half the page views are going to happen.

Here’s a link to our new teaching website. You can also take a look at the old design on the Wayback Machine.

Previously on The Collaborative Piano Blog: You Need a Website for Your Teaching Studio. Here’s Why.

The 1898 Toronto Conservatory of Music Annual Calendar by Chris Foley

This is an article in draft that I found on my Drafts dashboard that I originally (mostly) wrote well over two years ago but never published. Although I did post the photos on Facebook, I never posted them here. This is a strength of blogging that’s difficult to duplicate in social media - finding things from previous years.

—————

Back in November 2022, Wendy and I met up with The Royal Conservatory’s Chief Examiner Emeritus Tom Green to visit the Toronto Old Paper and Book show. One of my side quests in the last while has been tracking down old Royal Conservatory materials - I’ve got a 1918 Technical Requirements manual as well as syllabi from 1925, 1926, and 1927. These old documents can be hard to come by, so the OPB show was one of the only places where one might find, by chance, one of these relics of Toronto’s musical life of yesteryear.

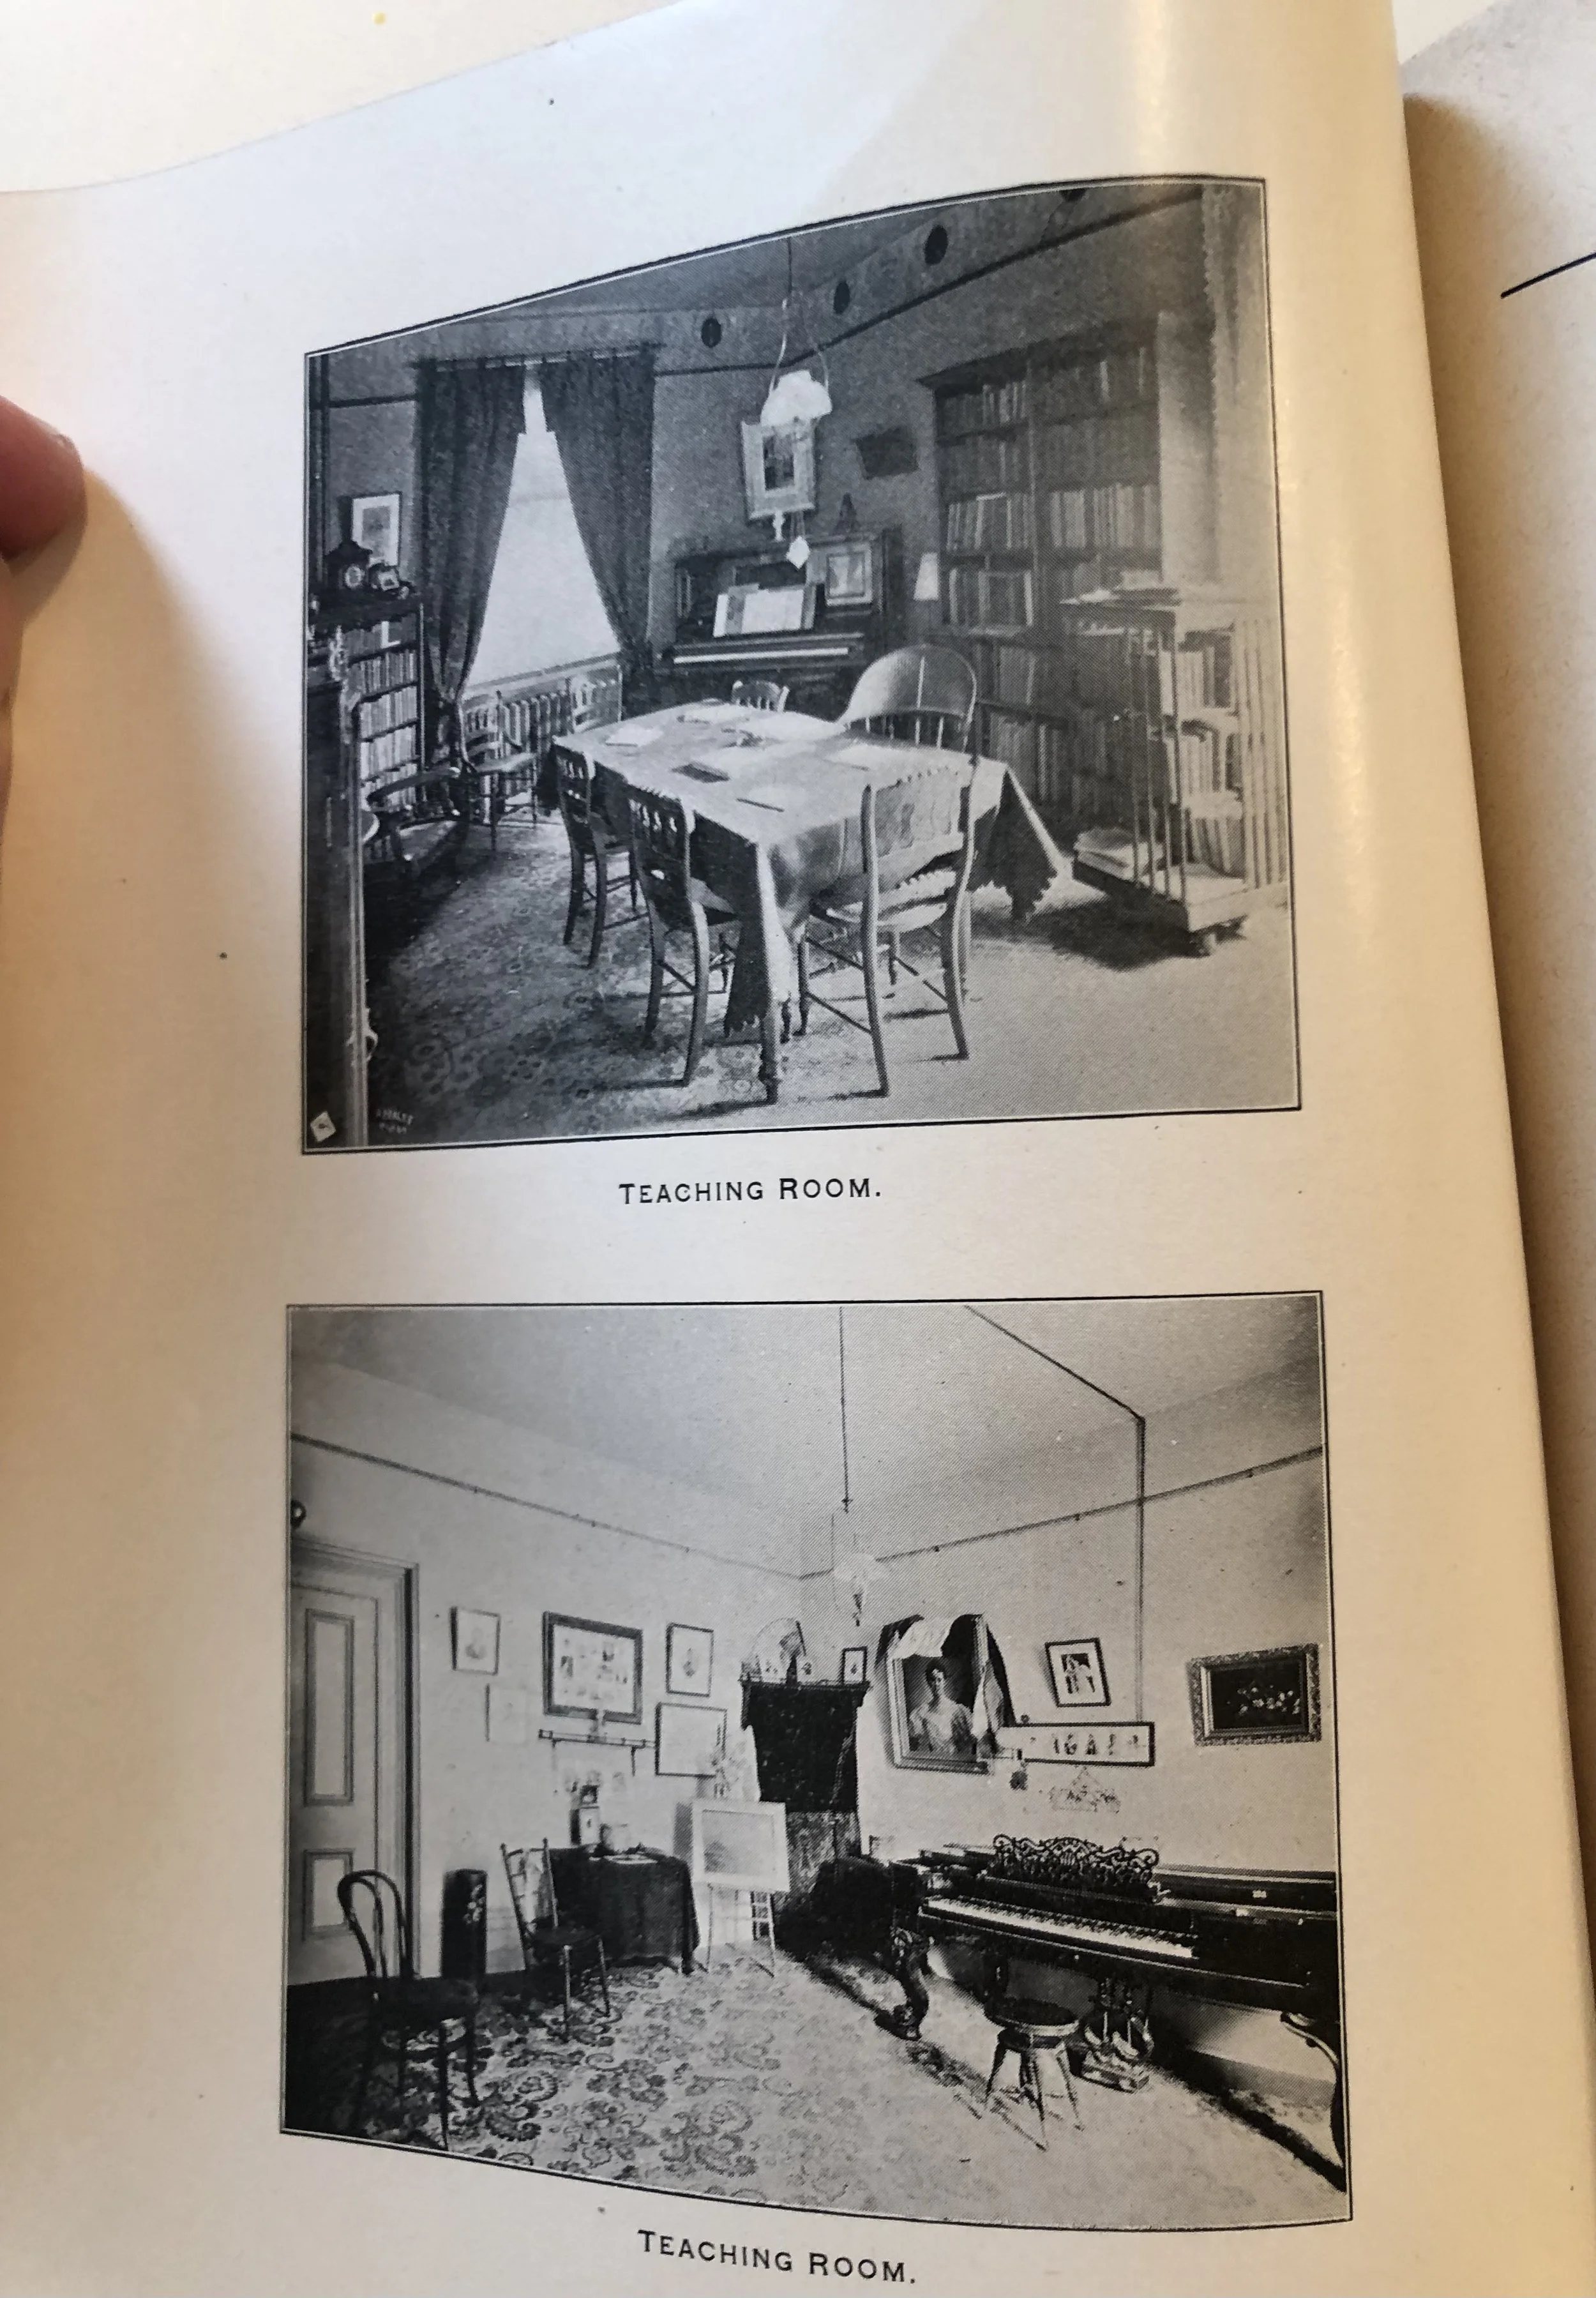
And I hit the jackpot, finding an 1898 annual calendar from the Toronto Conservatory of Music, the former operating name of The Royal Conservatory. This was the annual prospectus given out to the community that showcased photos of the TCM’s new digs at the SW corner of College and University in downtown Toronto (now the site of the Ontario Power Generation building), information about course registration, a listing of faculty and their rates, highlights from the annual meeting, as well as a complete listing of recent graduates.

Here are some interesting things about the old conservatory building, some of which I gleaned from the calendar and some from elsewhere:

  • The old Toronto Conservatory building was right across the street from the Ward, Toronto’s first multicultural neighborhood. Immigrants from many communities first settled here in Toronto, and the conservatory was a readily accessible cultural institution where they could learn both music and speech arts.

  • At the corner of University Avenue and College Street, the building was easily accessible via streetcar, and after 1963 by subway - the Queen’s Park TTC station was right by the building.

  • In the absence of central heating, studios and practice rooms were heated by fireplace.

  • The Conservatory Music Hall was one of Toronto’s lost musical treasures, and featured an electric Casavant organ.

  • Private lessons with Edward Fisher were $40 a term, consisting of a term of 10 thirty-minute lessons. With the rate of inflation calculated from 1914, that is now the equivalent of at least $1075.33, or more than $100 per half-hour lesson, over $200 per hour in current dollars allowing for inflation. By way of contrast, lessons with Edith Crittenden would have cost a much more reasonable $21.50 per lesson.

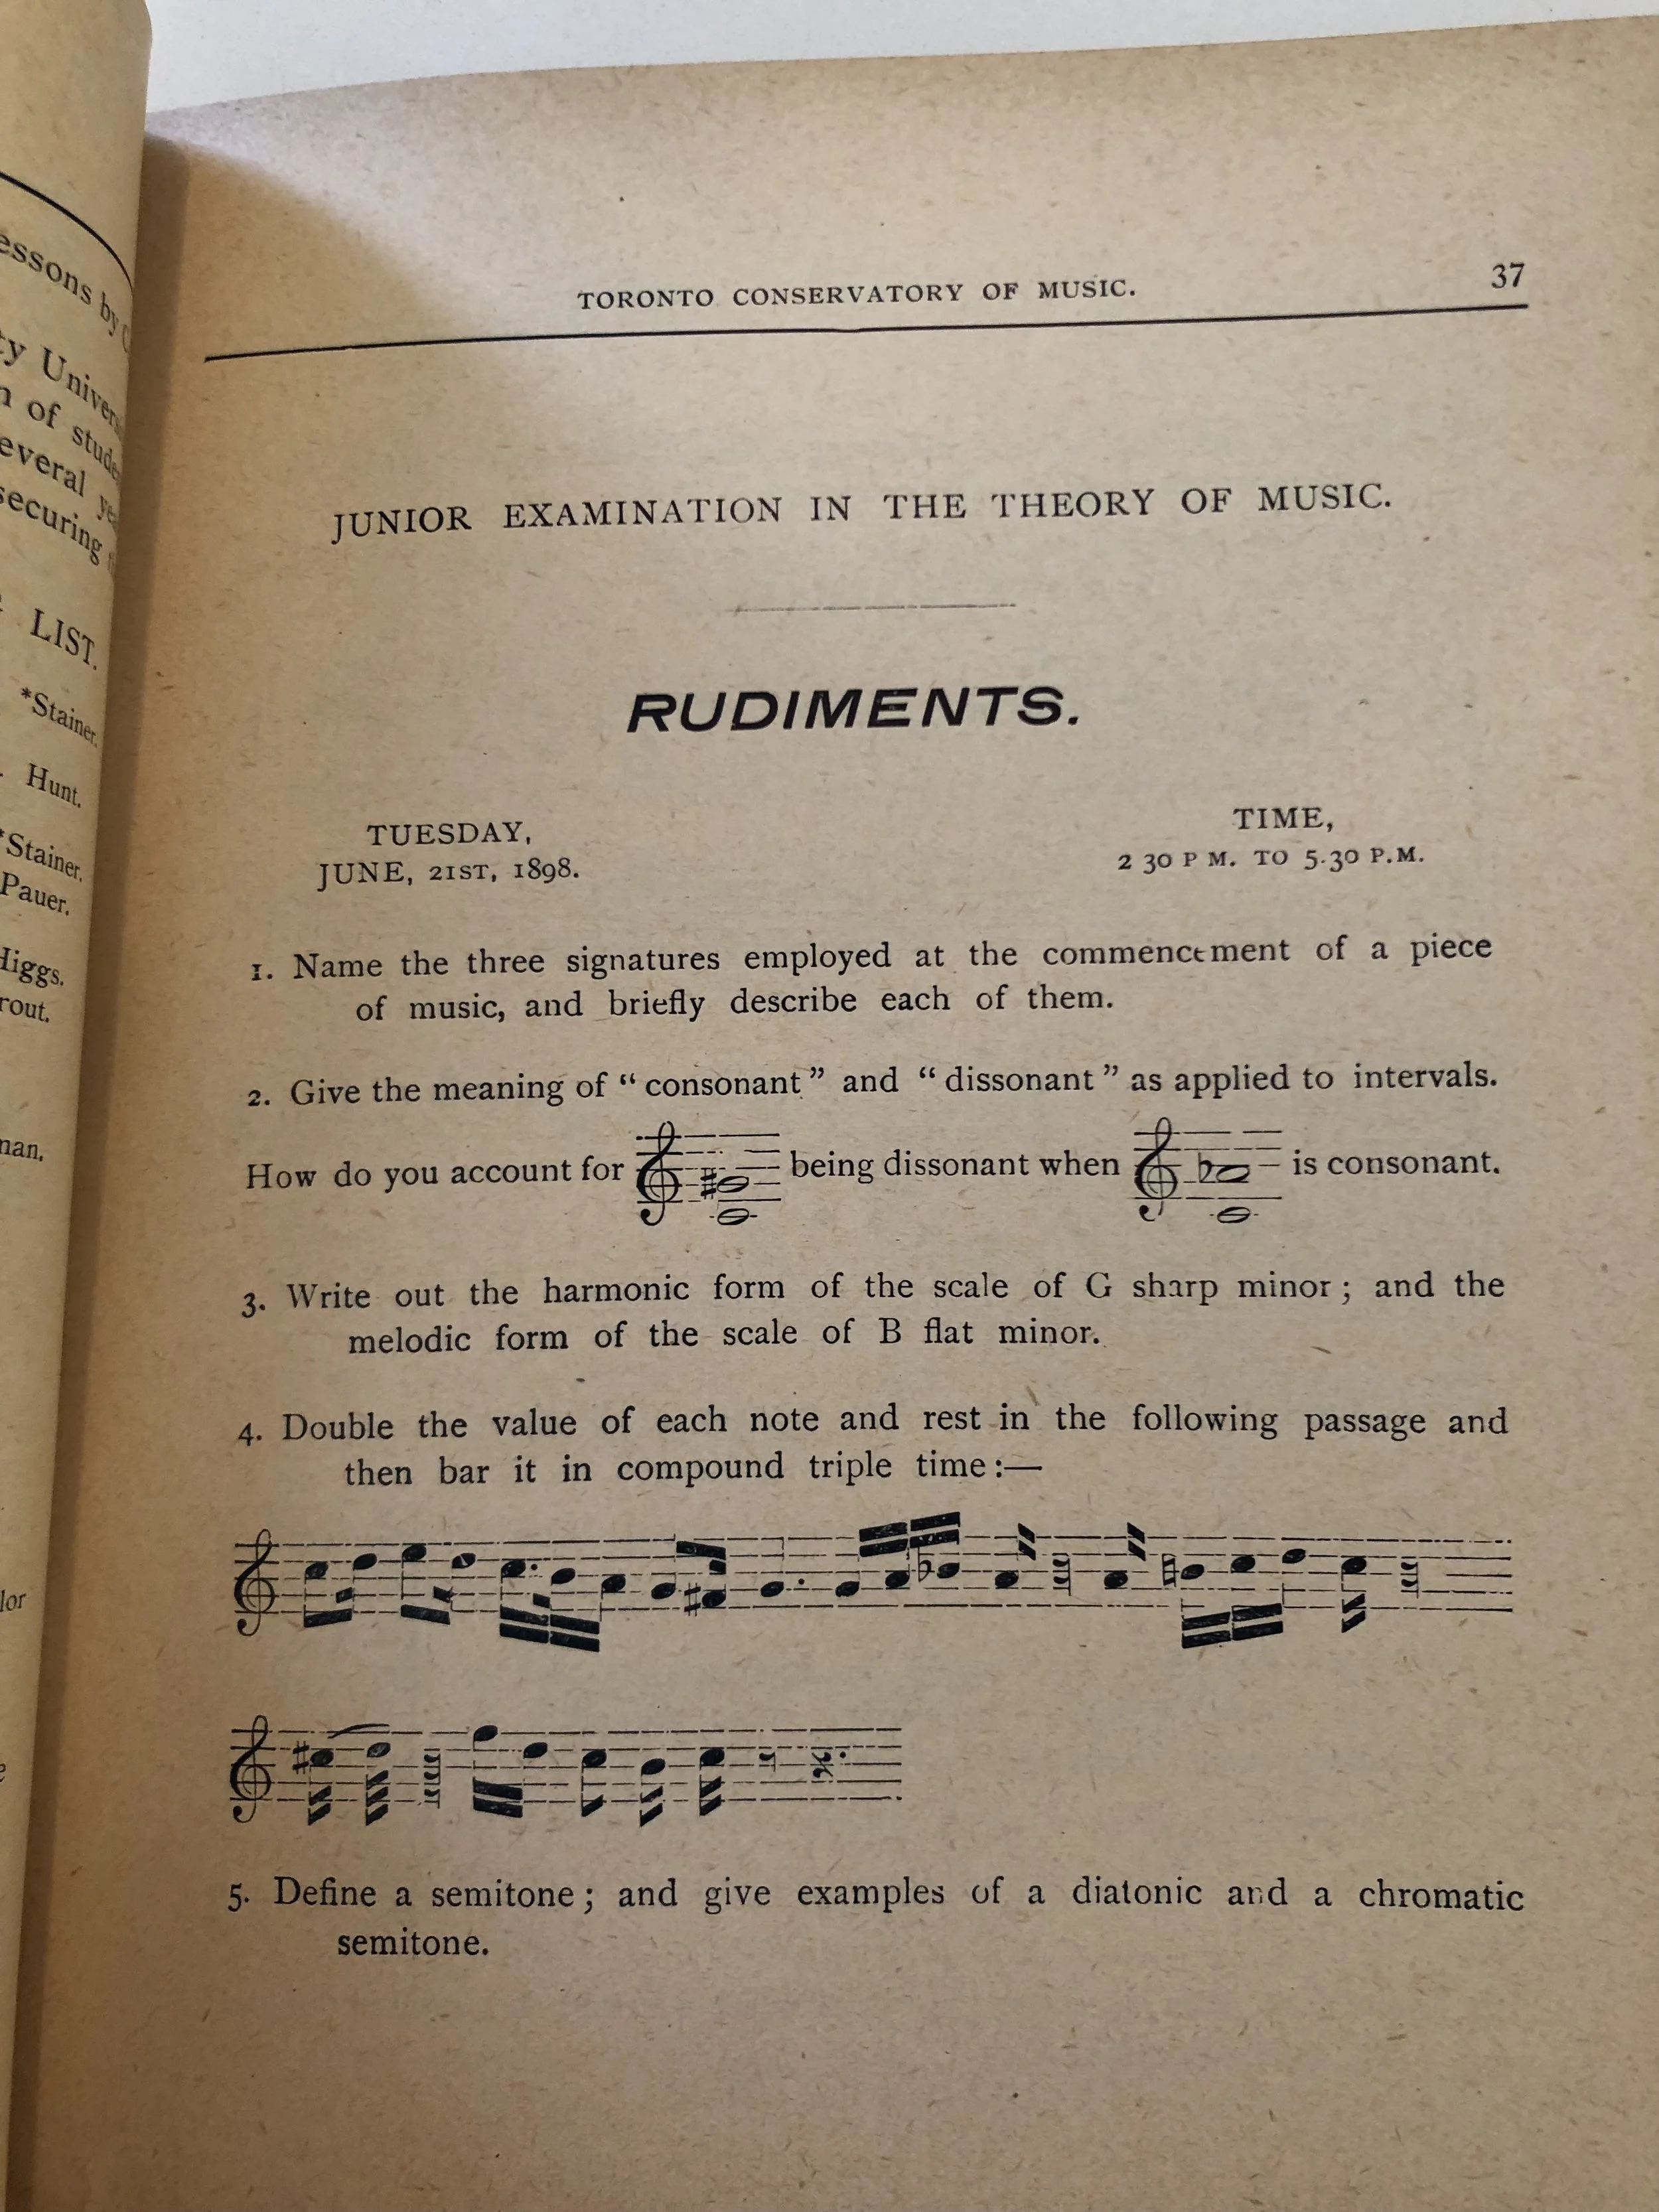
Here’s a question from the June 1898 history exam that I found to be quite challenging for our 21st-century sensibilities:

Write a short life of that great master who was born in Germany last century, and who died in England this century.

Which composer was this? Bear in mind the date of the history exam and leave your answers in the comments.

Stay Sane With Outcome Orientation Rather than an Information Diet by Chris Foley

Navigating the accelerating rate of information that is constantly thrown at us is one of the evolving challenges that every one of us are navigating. Add to the mix the new regime in Washington and its information/disinformation compaigns coupled with algorithmic feeds and AI-generated content makes the need to process information more important than ever.

Cedric Chin frames the challenge as Outcome Orientation, and he does it by asking a simple question:

“What is the outcome I am trying to achieve here?”

Outcome Orientation differs from the Information Diet in that rather than curtailing your information sources in order to consume them in a safer manner, you expose yourself to the full range of internet sources, but ask yourself for which goal you are consuming it first:

You may then continue with the action or consumption if you wish, but you must answer the question honestly first.

That’s it. The point is not to control your time allocation, the point is to always be aware of why you are consuming something as you are consuming it. If you do this, you will automatically change your time allocation as a result.

This approach might just work, as it frames the indiviaul as having agency over their environment, both in terms of the sometimes competing realms of self-interest and consequentialism, rather than being the victim of information overload with its related costs.

I haven’t published anything on this blog since May 2023 but early 2025 is as good a time as ever to return to it by Chris Foley

I want to get back into blogging and I know how to do it. Start simple, start at the level of the blog post rather than planning too much. The goal is output rather than views or stats. That’s no longer viable for me and doesn’t motivate the way it used to.

Ideas that can be strung along for multiple posts over weeks rather than single, long posts. Build a body of work from the outset.

Articles don’t need to be full essays, but flood the zone with lots of interesting short articles that lead to cool stuff, like Andy Hawthorne’s on blogging when most people will never read your articles or Annie Mueller writing about how she is going to keep making shit and hoping that we do too. Variety is good.

And it shouldn’t be toxic, which will already put me at an advantage compared to most media in early 2025.

Technical Resources for Advanced Pianists by Chris Foley

One of the strengths of The Royal Conservatory’s Certificate Program is how technique is fully integrated with the repertoire and musicianship components of each RCM level. However, once you pass Level 10 and move on up to the associate levels, there are no longer any specific technical requirements* beyond the mandatory List F etude.

At this level more than ever, pianists need a regular technical regimen in order to grow pianistically, and beyond a certain point, the full complement of scales, chords and arpeggios in the 2008 Piano Technique Book can be a bit limiting.

Below is a listing of public domain resources to work through over the course of your advanced studies and beyond. Some of these pdfs are rather large, so you might find it useful to print out only what you need. Otherwise all of these can be used on iPad apps such as forScore.

  • Hanon - The Virtuoso Pianist. I recommend the first 20 exercises for the most part, as well as 21-30 afterwards. For an extra challenge, you can develop considerable dexterity by learning the first 20 in all 12 major keys, as well as in a variety of different rhythms.

  • Pischna - Technical Studies. These exercises are useful in small doses for dexterity and alignment.

  • Dohnanyi - Essential Finger Exercises. The first section is similar to Pischna, but the following sections explore a wide variety of technical skills in interesting ways. I particularly like the octave arpeggio exercises near the end of the book.

  • Czerny - 160 Short Studies. Each of these 160 short studies is only 8 bars long and can be learned in one session. There’s always something new to explore with these, and they can be tackled numerically or in whatever order you choose.

  • Kullak - School of Octave Playing. Octaves figure prominently the advanced repertoire, and Kullak’s approach helps you learn these skills effectively. The brave of heart can work through the 7 Octave Studies that comprise the second part.

  • Tausig - Studies in Double Thirds. Carl Tausig’s scale system in 3rds covers all the major and minor keys with excellent fingerings. These can be very helpful with legato skills.

  • Liszt - Technical Studies. Franz Liszt’s works for piano are some of the towering highlights of the piano repertoire. Within these 12 books of technical studies you’ll find preparatory exercises for almost all the challenges he throws at you in his piano works.

  • Brahms - 51 Exercises. These mostly short studies are not for the faint of heart, but offer a variety of technical approaches to help you to get around the challenges of Brahms’ piano works.

Advanced piano technique is like CrossFit for piano. Rather than limiting yourself to the same regimen every single day. I recommend a variety of approaches. If you change up your technical routines, you’ll develop a sizeable bag of tricks that can be applied to many situations in the repertoire. With the guidance of a first-rate teacher, you can also discover the right way to work through these exercises while avoiding injury.

* NB: unless you’re doing the Advanced Piano Pedagogy Practical exam.

Reimagining my Writing Process, or How I Intend to Not Plan My Blogging Activities by Chris Foley

The keyboard of my aging MacBook Pro from early 2015. Still going strong, but perhaps time for a new one.

I write a lot. On my teaching days I usually type around 2000 words of lesson notes for my students over 5 hours of piano lessons. Examining days are even more intense - I estimate that I’ll probably type as much as 3000 words a day when writing exam reports. This is mostly technical, pedagogical writing and is integral to the type of work that I do as a teacher and an RCM examiner.

But at the same time, I like to write as a blogger. The challenge is that this type of writing is all in addition to the words Ichurn out for my regular work, so time needs to be set aside for the additional challenges of writing blog articles regularly. Sometimes I’m exhausted.

Since last summer I’ve found it difficult to focus on my creative blogging outlets. I’ve learned that my writing tends to come in fits and starts and I want to change that. The idea of sitting down regularly to write blog posts has seemed daunting, especially as my own experience in the profession doesn’t lead me towards cut-and-dried opinions on what’s going on.

Lately I’ve ben thinking about how I can return to blogging and what kind of process could make it viable. Maybe not a newsletter this time around. The weekly looming deadline didn’t work well for me and created a lot of tension over time.

For my blogging, planning in general doesn’t work well beyond a few specific writing projects from time to time. The times where blogging worked out best were times when it was largely unplanned and spontaneous, exactly the way that people post on social media.

So as I move forward I aim to be more deliberate about not planning what to do next, beyond a few ideas and subjects. The present-tense bias of this kind of work might allow more organic growth in the kind of stuff I’m interested in writing about without having a concrete plan.

15 Levels of Turntable Scratching by Chris Foley

DJ Shortkut looks at the different levels of turntable techniques that go into the art of scratching. Although many of us grew with these sounds, the actual techniques and how they fit together is often a mystery until you hear an expert break it down, if you’ll excuse the pun.

What I can also appreciate here is the sense of listening, feeling the beat, and mastery of technical skill that goes into turntablism. Although Shortkut makes it look easy, years of practice is needed to master these skills, just as with any other instrument.

(Via Kottke)

16 Ideas for First-Time Music Festival Adjudicators by Chris Foley

The atrium space of the Shadbolt Centre for the Arts in Burnaby, British Columbia

I originally wrote this article for the Music Teacher’s Helper blog back in early 2012. Unfortunately, MTH lost some of their blog archives when they were bought out last year and the original location of the article was lost. Fortunately, Dina Pollock, editor of the BCRMTA Progressions Magazine, was kind enough to reprint the article for the Spring 2012 edition, and it was this reprint that still existed 10 years down the line. Special thanks also go to Amy Boyes for facilitating the revival of this article for her work for the Canadian Music Festival Adjudicators’ Association.

When I was a student, I looked with dread upon the fearsome weeks of the local music festival. I would prepare my pieces for months beforehand, work them up to a performable level, then walk in terror up to the piano and play my piece with varying degrees of success. I would then sit in continuing terror as the adjudicator would proceed to tear my playing apart, with only the tiniest glimmer of hope that there was something remotely musical about my feeble attempt at musical taste. Sometimes I would win, sometimes I wouldn’t, but there was always the feeling that the adjudicator was there to anoint a select group of chosen ones, and as for the rest, well, there’s always next year.

Many years later, I found myself onthe other side of the table, being asked to serve as adjudicator for some of the same competitions in which I had once competed. As time went on, I also found some of my colleagues asking me for advice on how to both survive and thrive when adjudicating for the first time. Here are some of my thoughts on best practices big and small that can make your adjudicating experience a positive one for yourself, the young performers who play for you, and the musical communities into which you make a cameo appearance.

Getting Organized

1. On the first day, arrive at the venue well ahead of time. Use a service such as Google Maps to find where you’re going easily. Once you’re in the venue, you’ll need to properly configure the room (often a church sanctuary or multi- purpose space), finding the best location and angle for the piano as well as your desk.

2. Sign what you need to sign before you start. Certificates and adjudication forms all need your signature on them, and it’s best to go through the signing ritual before the start of the day, allowing for a smoother flow once you’re compiling marks.

3. Learn the marking system that the festival uses. Do marks start at 80? Or is 80 the equivalent of a medal- winning performance? Talk to the festival organizers about this well ahead of time – often festivals have a written expectation of where they wish mark ranges to be.

4. Befriend your assistant. Most festivals provide adjudicator’s assistants, who compile the scores and write names on certificates (which you have already signed – see #2). Treat them well. If there’s anything you need from them, ask politely. Adjudicator’s assistants can make your life considerably easier.

5. Bring your preferred pens and pencils. Whether it be an extra fine Sharpie, Pilot, Waterman, or erasable Bic, your choice of pen can either help or hinder you when you’re writing out dozens of adjudications every day. If you’re writing in permanent ink, be sure to bring either correcting fluid or tape. A pencil is also a good idea for jotting down notes.

6. Always keep a backup copy of all marks. Towards the end of the festival, you’ll often need to tabulate totals in order to determine scholarship winners.

7. Organize your territory. The adjudicator’s desk is a sacrosanct area of the festival venue. Make sure that there is enough space between you and the audience, so that your every written word and mark is not scrutinized by the prying eyes of parents (and teachers too!). On your desk, figure out where you’ll put the comment sheet, your writing utensils, the score of the current student, scores of previous students, and scores of students who have yet to play. A stand-up clock is also a good idea, so you can see how you’re doing for time at any given moment.

8. Determine the festival’s stand on copyright. Nearly all festivals have an original and/or authorized copy policy in place. If a student hands you a photocopy, know what the penalty is, if any. At the same time, educate yourself on how to spot authorized copies from services such as CD Sheet Music or IMSLP.

The Written and Public Adjudication

9. Write clearly. Legions of teachers, students, and parents, annually spend hours trying to decipher the illegible scrawls of musical authorities sounding forth on a variety of subjects. Writing so that others can actually read your comments can do a world of good and ensure that your suggestions might actually be followed.

10. Speak clearly and accessibly. When you give your public adjudication after the students have performed, remember that you are speaking not only to the students, but to their parents, friends, and teachers as well.

11. Strike a balance between positive and negative critique. To put it bluntly, adjudicators who are ruthless in their assessment of students are doing a tremendous disservice to students, teachers, and the music education field as a whole. All that adjudicators really need to do is reward the positive (no matter how negligible the accomplishment) and provide some ideas for further development. And they need to do this for every single student who performs.

12. Strike a balance between speaking to the class as a whole and each individual performer. This is one of the tough parts. Spend too much time picking apart every performance and you risk being perceived as a curmudgeon. It’s usually a good idea to preface specific comments with a quick general overview of the class. Some examples: offering some insights on pedaling before an intermediate Romantic class or talking about the process of learning a fugue in an advanced Bach class.

13. Know whom you’re talking to. As an adjudicator, you must take into account the age and level of the students to whom you are talking. If they’re beginners, offer as much encouragement as possible. For an advanced class, you can be a bit tougher. On the other hand, it’s not a good idea to sound off on mid-ground Schenkerian analysis for a Grade 3 Sonatina class, nor do students in a senior concerto class wish to be addressed like Kindergarten students.

14. Change the focus of your talks frequently throughout an adjudication week. No one likes to hear a broken record. At the same time, it can be difficult to be continually thinking of new things to talk about when you’re hearing the same problems over and over again. Therefore, it is important to put some thought into the balance between reiterating your core message and branching out into new avenues of discussion in the spoken adjudications.

15. After the adjudication and before you announce the winners, take a second to make sure that you’ve selected the right person for first place. This seems redundant, but is actually very important (make sure you’ve done #6 as well). Think of this part of the festival as reality television: since many parents are videotaping the proceedings, you’ll need to get your announcement of the winner right the first time in order that you can leave town with your head held high.

16. Thank everybody. Thank the teachers for the hours of hard work they do every day. Thank the parents for the uncounted hours of driving students to lessons and encouraging their children to practice every day. Thank your assistant (see #4). Thank the Executive Director of the festival. Above all, thank the students for having the guts to come up on stage and perform in a high-stakes situation.

At the end of the day, festivals aren’t necessarily about anointing champions and lauding the most talented. They are about creating positive musical experiences for the greatest possible number of developing musicians. Over the course of years, the students who end up having distinguished musical careers may not be the ones who won first or even placed in the local festival. Therefore, your job as an adjudicator is to encourage as much as possible, realizing that parents and teachers are relying on you to create enough of a positive experience for students that they will return to their instruments and continue their musical studies
for as long as possible. In these tough economic times, the music education world and the continuing good work of local music festivals expect nothing less from adjudicators.

Free Download: Level 9 and 10 Chord Progressions for Royal Conservatory Technical Requirements by Chris Foley

One of the challenges of the technical requirements for The Royal Conservatory’s advanced-level exams since 2015 has been the extended I - VI - IV - V6/4 - V8-7 - I chord progression at Levels 9 and 10 to be played following the 4-note chords. The 2022 edition of the Piano Syllabus only shows the realized version for the chord progression in C major on page 123. Many students are perfectly fine with figuring out the progression in all the required keys. However, some students need some help, and it’s for this reason that I’ve created these sheets that you can download and print for free.

Feel free to download, save, and share these pages. Best of luck with your RCM piano exams!

Product Cover look inside Piano Repertoire Level 10 Celebration Series, Sixth Edition. Published by RCM Publishing (FH.C6R10).


From Doomscrolling to Growthscrolling by Chris Foley

This is the first of several articles I’ll be writing on how I use Napkin to collect, process, and work with ideas in my note-collection system. Foley Music and Arts readers will receive a $10 discount on Napkin’s monthly and yearly plans when signing up - just enter FOLEY on the promo code space when you get to the checkout page.

Go to a live news feed and read it for a few minutes, especially live feeds about US politics, COVID-19, or the Ukrainian War. Your heart rate will rise, along with your blood pressure. You'll start to feel anxiety and helplessness. The Merriam-Webster defines doomscrolling (also called doomsurfing) as:

…the tendency to continue to surf or scroll through bad news, even though that news is saddening, disheartening, or depressing. Many people are finding themselves reading continuously bad news about COVID-19 without the ability to stop or step back.

James Tapper writes in the Guardian about how the need to understand and make sense of current events can make the anxiety worse:

Mental health experts are warning that public engagement comes with a cost in terms of anxiety that should not be ignored. Paul Salkovskis, professor of clinical psychology at the University of Oxford, who worked on measures to help people deal with Covid-related anxiety, said: “Clearly there are some people who are already anxious, who will be significantly more anxious, as happened with Covid – we saw a big increase in some subtypes of anxiety in the clinic. There will be some of that with this situation, but I don’t think it’s going to be the dominant response.”

What if you could feel the opposite of the compulsive anxiety triggered by doomscrolling? What if you could discover a reverse reaction that lowers anxiety and blood pressure while scrolling through information that helps you to feel agency, surrender, and a rush of possibilities?

Over the last months I’ve been using Napkin, a tool for connected thought that’s currently in beta. From Napkin’s website:

Napkin is built for short notes. Napkin’s core is the dynamic interface. It reveals connected ideas without an explicit search, based on association instead of hierarchy.

The uncovering of associations between notes is something that I’ve found beneficial. Here's how to do it using Napkin..

1. Regularly collect a body of information such as book notes, article notes, highlights from journal entries or morning pages, and enter it into Napkin. I tend to collect a lot of information from various sources and put them in places for these ideas to lay idle and eventually become forgotten. These can be in notebooks, emails, note-taking apps, social media, and other places. The important first step is to centralize the body of information that is relevant to you so it an be reviewed regularly and utilized. You can also selectively import notes from apps such as Notion or Roam.

Once a note is created in Napkin, you can add tags and bidirectional links between notes through a process called Magic Labelling. There are plans to eventually automate Magic Labelling but I prefer to do it manually in order to have more control over the connections.

2. Retrieve notes from your system through tags, note connections, and at random in order to uncover connections between ideas. Serendipity is paramount.

Revisiting previous ideas in a traditional journal or Zettelkasten is a slow and laborious activity that requires significant focus. With Napkin, the review is built in - the algorithm does it for you and random retrieval is baked into the service. It's like crack cocaine for positive ideas, creating a dopamine rush through moments of understanding of how disparate things could fit together when they're thrown at you randomly.

Here’s a look at what the Napkin refers to as the swarm of thought - the expanse of your ideas collected in the system:

You can navigate through the swam via tags, bidirectional links, through search, or randomly (the “r” keyboard shortcut is my favorite). Previous notes, rather than being neatly catalogued in a folder structure, are quickly ready to be retrieved for reflection and putting together with other ideas.

Many people might just be fine stopping at step 2. Being able to understand and process what's going on in our life is a major accomplishment in itself and is by no means easy.

But there’s a third step…

3. The connections formed between ideas can lead to personal outpout or further exploration. Personal output could include articles, Twitter threads, videos, workshop ideas, or even books. Some of the connections might also yield no answers, but result in opportunities for next steps in your reading, learning, or research.

Far from arriving at concrete conclusions, the connections discovered from growthscrolling are much more open-ended, resulting in questions and possibilities rather than answers:

  • How could I use this?

  • What could this lead to?

  • How do these ideas fit together?

  • What if I tried this idea?

  • What if I was wrong about this?

  • Where can I find further information about this?

  • How can I break through my apparent bias on this?

All of these questions lead to growth and further avenues of inquiry.

Similar to doomscrolling, the growthscrolling process also requires a large amount of information to wade through and put together. You’re the one who will need to put the time into putting together a meaningful and growing body of notes. In return, you’ll be able to generate positivity, agency, and the lure of latent possibilities.

In the next few articles I’ll be looking at the process of assembling material, inputting it into Napkin, and going from random entries to stacks, and from there to the first draft of an article.

(Image courtesy of David Vig on Unsplash)